How To Successfully Freeze 'n Fuse: A Tutorial
Posted on
What you'll need:
- Line sifter or small enameling spoon
- Small powder sifter (optional)
- Water (purified, if possible. Tap water works) in a small craft cup
- 4 craft cups
- Pipette
- Paper towel
- Glass powder (try starting with opaque colors)
- Pin, needle clay tool, or straight needle dental tool
- Flexible mold (preferably a clear candy mold to begin).
- Pre-kiln washed shelf. I use unglazed 6 x 6" bisque tiles. They are light, easy to kiln wash and have a very smooth surface.
- 2-4 kiln posts
A good way to start is to organize all your tools, water, and paper towel around your candy mold. Place your glass powder in a line in front of you. Work with one powder color at a time. It's very easy to dump the wrong color into a container of frit if you have all the lids opened at the same time.
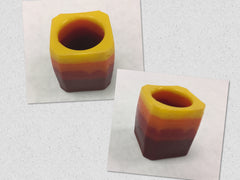
Think of the bottom of your candy mold as the top of your piece and the last top layer as the bottom. The center of the freeze and fuse will not show. You are mainly interested in getting the bottom and edges of the mold executed accurately.
Some notes:
- I prefer to use a line sifter for detail and a powder sifter for broad areas of color. Using a spoon and dumping in the powder can trap bubbles.
- A clear candy mold allows you to look at your progress by picking up the mold and checking for bubbles on the underside.
- Beware of unintentional reactions. If you want to use a sulfur glass next to a copper glass without reactions, separate them with a layer of clear powder, especially at the edges and bottom of the mold.
- Molds that are too shallow will not work. The frozen piece will fall apart when you try to pop it out of the mold. If you have a very deep mold, you don't have to fill it all the way up.
The Process:
- Place your candy mold on a level surface on four craft cups if possible. Some molds will have no place to perch on the cups. Put those molds directly on the table.
-
Begin by line sifting in the detail at the lowest points in your mold.
Remember, you are working from the bottom up. If you try to fill in the higher spots, they will just wash into the lower points of the mold, muddying your design. Patience wins the day here. Put down a thin layer of powder. Powder that is applied too thickly will trap air. - After the powder is in place, use your pipette to wet the powder. Don't use too much water. Just enough so a thin layer of moisture shows at the top of the powder.
- FIRMLY tap the edge of the mold until all bubbles are released. I like to use my metal line sifter to tap. If you only have a plastic one, use a metal dental tool or something made of a heavier material than plastic to tap.
- Wick the excess water with a paper towel. When wicking out the water, try not to disturb the edges of your design.
- Check for bubbles. Lift the mold while trying to keep it level, and check the underside for pits (bubbles). If you see any, add more water and tap again. If this doesn't release the bubble, lift the mold, locate the bubble and stick the needle tool straight into the powder. That should do the trick.
- Powder, water, tap, wick until you have reached the top of the mold.
- After the mold is filled, wick the water until it looks only moist. Then tap again. A very thin layer of water should float to the surface. If it doesn't, add a few drops of water. You need enough water to bind the powder.
- Place your mold in the freezer on a level surface for 20 minutes to over an hour. I've often forgotten the mold overnight! 60 years old and all that! If you do forget it, take a look and make sure the exposed top of the mold doesn't look too powdery. If it does, re-wet it with a couple of drops of water. Freeze for 15-25 minutes and you're good to go. Letting the mold languish in the freezer for too long will not give you a good result.
- While your mold is in the freezer, set up your kiln with the shelf and kiln furniture. Pre-Program the kiln (See firing schedule below).
- Take your mold out of the freezer and bring it to the kiln. Carefully turn your mold upside down and hover very close to the surface of the kiln shelf. Torque the mold so your piece or pieces land gently on the shelf. You can pop out the piece into your hand, but you run the risk of melting or breaking your piece.
- Close the kiln lid and push start. You should have already programmed your kiln. Try not to let your pieces melt on the shelf.
Firing Schedule:
- 500-1225/1275-.15
- 9999-900-.30
- 200-700-0
The first segment can be amended up or down for your kiln. If you want a sugary look, use the lower temp. If you want a shinier finish, use the top temp. Some people would say you don't have to anneal these. I like to err on the side of caution.
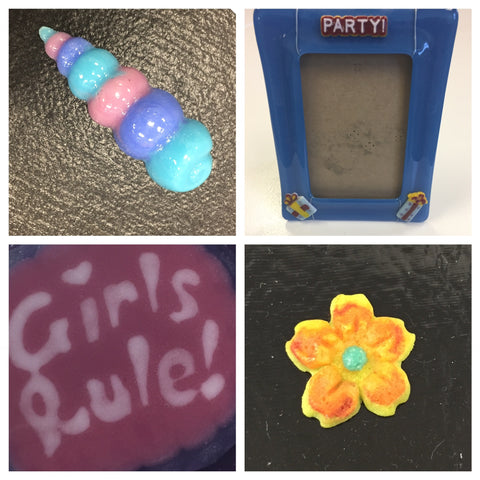
There is a learning curve for this technique. Your second will be better than the first, and eventually, you will be able to get fine detail in your work.

Share this post
- 3 comments
- Tags: casting, tutorial
3 comments

I have successfully completed a freeze and fuse piece. I want to add them to a final piece. What would I set the kiln at so I do not lose the definition of the flowers?
Thanks for the great tutorial!
I wish this had been posted one day earlier!!